Impressed with Impress

“Your nails are a reflection of yourself”


Fact. That is exactly why I always try to have my manicure looking top notch. Let’s get real tho, it can be super time consuming to constantly be painting your nails or really expensive to keep up with your fills at the salon. SO, if you’re like me and really enjoy having professional and trendy looking nails on a budget, keep on reading!

imPress-Press-On-Manicure-by-Broadway-Nails-original-1024x782

The original packaging, which is still in some stores, were made to look like cute little bottles of nail polish.

Senior year of college in NYC, my roommate and I were walking thru Times Square and saw a sign that said “FREE MANICURES”. The world free always catches a college students attention. We made our way to the commotion and a group of women, from the Impress Manicure Company, were giving away free packs of their new products. These products just so happened to be press on nails. Retail for around $10. I took a few packages never thinking I would actually use them. Like come on, I haven’t used press on nails since I was like seven. Well, fast forward a few weeks and I gave them a shot. Followed the instructions word for word and BAM! For the next two weeks I was getting complimented on my manicure! People were assuming they were actually gel nails because they had such a great shine to them! I was hooked! Oh and yes, you did read that right.. TWO WEEKS!

I’ve always been one to obsess over instructions on beauty products, so let me give you a run thru on the instructions and highlight the most important steps. By the way, it usually only takes 15 minutes or less once you get the hang of it.

ImPRESS Accent Press-on manicure

These are the packages I have seen more and more lately! They constantly come out with new designs and trendy colors!

Each package contains 24 nails. Obviously you only need 10, but there are 12 different sizes to ensure you get them to fit your nails correctly. The first thing I always do is, besides taking my nail polish off, is trimming my nails down because you don’t want your nails to be longer and poke thru underneath. Next, I pour out all the nails, find one for each finger and lay them out left on one side and right had on the other, so I don’t mix any up. Never start with your thumbs! It will make the process a lot harder than it needs to be, trust me. With that said, start with your pointer finger, find the nail that fits, slowly remove the plastic strip from the bottom and gently press it on your nail. Press it on in almost a rolling motion and do that for about a minute. In the past I have just plopped it on and pressed it once, and well those came off in a few days. Anyway, just do your thumbs last and enjoy your new beautiful manicure!

Broadway-Nails-Step-to-Impress

They even have ones for your toes that are just as easy!!! I am addicted to using them in the summer!

Removal is just as easy! Gently peel them off! I usually wear them until it’s obvious my nails are growing under them and I go pop on a new pair! The only con I can really think of is, if you’re like me, I constantly run my fingers thru my hair and sometimes my hair gets caught under the fake nail. Besides that, they are nearly perfect!!

Screen Shot 2015-11-11 at 12.23.18 PM

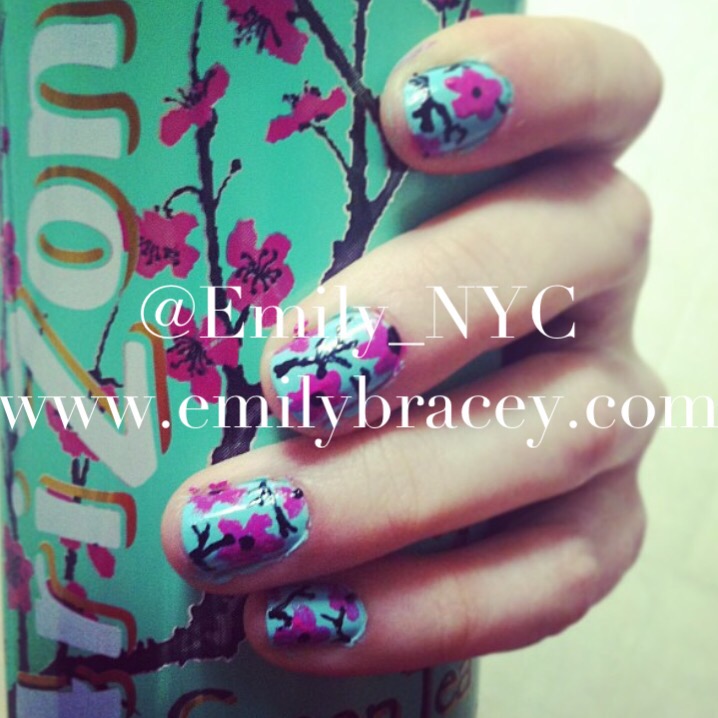
My current Impress Mani. I’ve had these babies on for about 13 days now. There is some nail growth, but I will probably wait a few more days before I change them out!

Nailed it, begins!

For over the past five years I have been quite the nail polish, owning well over 300 colors, shimmers, and shines. Like all things in my life, I tend to go above and beyond; so I take a picture and document it. I’m adding a page to upload all my nail art designs from the past, present, and future! Feel free to repost my pictures or use them for your own inspiration, but please tag me because I would love to see your creations!

2015/06/img_2550.jpg

2015/06/img_2531.png

The Booty

From Kim Kardashian to J-Lo and more, 2015 is without a doubt the year of the booty. So what if you have been cursed with a fanny as flat as a pancake? Ya squat! Seriously! My behind was always a boney joke for all who knew me, but in less than a few months of hitting the gym I had a backside to be proud of! And you can too!

My favorite booty lifting/forming/toning workouts include weighted donkey bridges, double pulse stationary lunges, weighted glute bridges, and of course… SQUATS! I work my glutes probably 3 times a week and do 4 sets of 15-20 depending on the workout. My last trick is fast walking on a steep incline for my cardio!
I also HIGHLY recommend participating in one of Katy Hearns fitness challenges!

2015/06/img_9924.jpg
November 2014- February 2015- March 2015

DIY T-Shirt Recycling

Have a large/old T-Shirt that you wish was more up to date or fit better? Or are you like me and have a closet full of your brothers old shirts and wish it was a girl’s top? Well I found a super simple guide on pinterest that I wanna share!

t-shirt-hack-2

and here’s mine…

11103927_10153757591829616_664243394_n

Sorry about your shirt, Dan. Ya snooze, ya lose 🙂

Clear Skin Regimen

Growing up I was always the one with the terrible skin. I’m not that girl that gets one or two zits and acts like the world is ending (and if you’re one of those girls, go eat some dirt). Anyway, since seventh grade I had red, blotchy, cystic acne, pimples, and huge pores! To me, it wasn’t such a big deal in middle school because everyone else was going through it, but then high school came around, college, then graduating college… you get it. The thing about having acne… IT SUCKS! I tried everything to clear my skin and nothing has worked until the past 8 months! I tried Proactive, Clean & Clear, Clearasil, Neutrogena, Biore, Stridex, Tetracycline, Tri-Cyclen, Differen, Benzaclin topical, Retin-A Micro topical, Duac topical, Minocin, Benzac, Witch Hazel, Zapzyt, Noxema, Cetaphil, Clinque, chemical peels, laser treatment, and many more. I also tried Accutane, which is a super high dose of vitamin A. When I was taking it I was always in pain, dealing with super dry skin, having a daily bloody nose, and my was hair falling out. It was awful.

So what has changed in the past year to leave me with the clearest skin I have ever had? Just a few changes!

1. Invested in a Clarisonic Mia 2. Directly from http://www.clarisonic.com, “Cleansing is the essential first step in a healthy skin care ritual. The patented Clarisonic Sonic Cleansing Brush uses a sonic frequency of more than 300 movements per second to deeply cleanse the skin far more effectively, yet more gently, than traditional superficial cleansing or simple rotating brushes. The result is noticeably smoother, more radiant skin.” I am obsessed and could no longer imagine my life without it!

2. What do I use with my Clarisonic? A soapless cleanser! Yes, soapless… as in no soap! Two brands I stick to are Basis (can be purchased at Wegmans) and Purpose (can be purchased at almost any drugstore and Walmart). The soapless cleanser idea was suggested by a dermatologist a few years back. It is not harsh on my sensitive skin and doesn’t overly dry it either.

3. I drink at least one gallon of water a day. It’s that simple. Hydrate your skin, people!

4. Diatomaceous Earth. I take two tablespoons every morning! What the heck is that anyway, right? I’d rather make that another post for another day, but for now check out http://diatomaceous.org/

5. I take off my makeup every night! No matter how tired (or drunk) I am, I always grab a makeup removing cloth!

prod_Washk2-_7c1f185d-37ee-4593-b15b-58127a9acb3b.v1

clarisonicmia2buy-500x500

I really really hope this helps someone out there who is dealing with acne! I understand how emotionally draining it can be, but keep your chin up! Took me ten years, but my skin is finally pretty much acne free 🙂